Hardering your raspberry Pi

Introduction
I have a Raspberry Pi since 2017, which runs several servers and programs 24/7, but I have never thought of securing my Pi until now. Hence, here you have several tips that you could use in order to make your Raspberry PIs more secure.
Keep your Pi updated
The first thing and so, the most important is to keep is to keep its system updated. There are 2 ways of doing it:
Manually:
Automatically:
This process will update your Pi daily basis.
$ sudo apt-get install unattended-upgrades
Avoiding unnecessary emails to root:
- sudo vim /etc/apt/apt.conf.d/50unattended-upgrades
- Comment this line:
- Unattended-Upgrade::Mail "root";
Set daily periodic updates:
$ sudo vim *etc/*apt/apt.conf.d/02periodic Adding this lines:
APT::Periodic::Enable "1";
APT::Periodic::Update-Package-Lists "1";
APT::Periodic::Download-Upgradeable-Packages "1";
APT::Periodic::Unattended-Upgrade "1";
APT::Periodic::AutocleanInterval "1";
APT::Periodic::Verbose "2";
Debugging the configuration:
$ sudo unattended-upgrades -d
Change your user
Due to all Raspberry Pis come with a default username (Pi), you should create a new username deleting the former.
Creating a new user:
- $ sudo adduser user1
You will be prompted to create a password for the new user and then, a new folder will be created /home/user1
Adding the user to the sudoers group
- $ sudo adduser alice sudo
Deleting the old user.
$ sudo deluser -remove-home pi
You must take into account that some aspects that require the “pi” user to be present. If you aren’t sure whether it will be affected by this, then leave it there and just change pi’s password
Make sudo require a password
By default sudo doesn’t need a password. So if someone hacks your Raspberry Pi because, it is connected to the Internet, He or She could run anything with privilege mode. To avoid that you need to:
Change the pi entry (or any other usernames that have superuser rights) to:
pi ALL=(ALL) PASSWD: ALL
Improving SSH security
Allowing or denying specific users by modifying the sshd configuration file.
This line will allow you to log in the specifies users:
AllowUsers user1 user2 user3
This other will stop some usernames from logging in:
DenyUsers admin1 admin2
and finally, this one will avoid anyone to connect through ssh as root:
#PermitRootLogin prohibit-password
After this change, you will need to restard the sshd service:
Changing the default SSH port
In this case, we need to modify “sshd_config” file again. Find this line:
Port 22
and replace it by whatever you want
Port 5687
Once again, save the file and restart your server
sudo service ssh restart
Using Key-based authentication
One of the advantages of ssh is the usage of generated keys in order to to log in to your account.
Generating a key pair in Linux is done using “ssh-keygen” command (Client Side). You will be asked for a passphrase, which will generate 2 files. Those keys will be generated at your current folder. <nameOfFile> & <nameOfFile>.key. However, if you couldn’t find them look at ~/.ssh/. The passphrase will be used with the key file to log in through ssh.
Once, you must copy <nameOfFile>.key to your raspberry pi.
>> ~/.ssh/authorized_keys’
Finally, you just log in to you raspberry pi as usual, and you will be prompted for the passphrase you created earlier.
Install Fail2Ban
Fail2Ban is a tool which detects brute-force attacks. Fail2Ban will block IPs if they fail to login more than X times.
Install Fail2Ban
$ sudo apt-get install fail2ban
Change default configuration
$ vi /etc/fail2ban/jail.local
If you want to permanently ban IPs, set a negative number in the bantime.
Restart the service
$ sudo service fail2ban restart
Installing a firewall (UFW)
Ufw (Uncomplicated Firewall) is a simple firewall which, like other firewalls, will block all ports except the ones you need, and filter access by IP.
Install ufw
$ sudo apt-get get install ufw
Configure ufw
Allow apache’s services
Allow SSH access for your internal IP
- Enable firewalls
If you want to show your current rules once you have enabled ufw:
Secure Apache
1. Password Authentication
For instance, if you have an apache server running and there are certain webpages, which only some users can get access to it, this is what you have to do.
Install apache and its utilities
Create a password file
This file will contain usernames and password that will be needed to access to your private webpages.
Because, this will be the first time you create this file, you will need to use this parameter “-c”
You will be asked to supply and confirm a password for the user.
If you want to add more users, leave out the -c parameter.
Configure apache to provide authentication
Authentication is done on a per-directory basis. To set up authentication, you will need to select the directory you wish to restrict, and add the following lines.
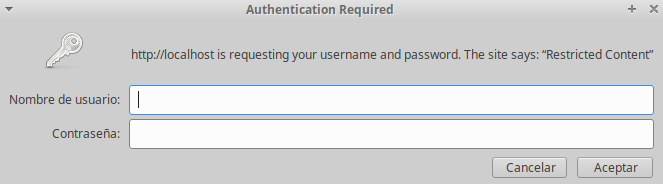
Finally, once you access to your private webpage, a pop up will appear.
To conclude, there are more services that I didn’t mention, that is because I have never use them and I don’t want to write the definitive guide for system administrators. Hence, I hope that, with these little tips you can developed your own prospects in your new safety Raspberry.