RubberDucky Modules - [Hak5]
![Cover Image for RubberDucky Modules - [Hak5]](/assets/images/blog/rubberDucky-hak5/RubberDucky.png)

Introduction
A Rubber Ducky is one of the most useful hacking gadgets that you can find in the Hak 5 Essential Kit. You can buy it on https://shop.hak5.org.
Design
The rubber ducky relies on 5 aspects of its design.
Payloads
Payloads are the scripts that tells the rubber what type or even when to type something.
Ducky Script
Ducky Script a simple scripting language in which payloads are written. Ducky scripts can be written with any file editor like, notepad (Windows), textedit (Mac), Vim, Emacs, Nano, Gedit, etc. Ducky script files must be standard ASCII and cannot contain unicode characters.
Duck Encoder
The USB Rubber Ducky doesn’t read the Ducky Script text files natively. Indeed, expects a binary keystroke injection file, converting these human readable payload into an Inject.bin. There are several open source and online Duck Encoders online.
Inject.bin
The compiled version of the Ducky Script that must reside in the root directory of a micro SD card.
Firmware
The firmware is the code running on the USB Rubber Ducky CPU which processes the inject.bin file, injecting keystrokes on the target device. Because of Rubber Ducky is open code, many alternative firmwares may exists which may be specialized in different attack techniques.
Components

- The USB To MicroUSB Adapter
- The MicroUSB To USB Adapter, the plastic dongle with a string attach to it. It is used to mount your microSD on your computer, like a normal USB storage thus you can transfer the payload to it.
- MicroSD Card, a 512MB microSD card with enough space to host your inject.bin file. It is important to always safely eject the micro SD card from the host computer to avoid damage.
- The Rubber Ducky, a blue board with an USB and a micro SD reader. Furthermore, this is the key in order to do your keystroke injection attacks.
- The Rubber Ducky Case, the two black pieces and the steel one are used to put you rubber ducky inside it, creating the appearance of a usual USB.
Rubber Ducky Internals
A rubber ducky is a 60 MHz 32-bit AT32UC3B1256 CPU with 256K of onboard flash, USB 2.0 interface, Micro SD card reader, micro push button and multicolour LED indicator and a standard USB Type A connector.
Micro SD reader
The microSD Card reader supports FAT formatted cards up to 2 GB.
Micro push button
This button is used to either a replay a payload or flash the firmware.
To replay a payload after initial connection and attack execution on a target computer, simply press the button once and the payload will re-deliver.
To enter firmware flashing mode, hold the push button while connecting it to the host computer. Firmware flashing is achieved using the unlocked DFU bootloader.
Multicolour LED Indicator
The LED will flash green once the payload is being executed, saying that it is starting typing out the keystrokes encoded in the inject.bin file. If the LED turns solid red is due to an error with the SD card. For instance, if the inject.bin file has been encoded incorrectly, named incorrectly, not located on the root of the Micro SD card or, if the SD card has been damaged or corrupted or is not seated properly.
Attack workflow
Reconnaissance
The first step in every single attack is the information gathering. In this point, the attacker should seek to determine the software and hardware being used by the victim before going in.
Since the USB Rubber Ducky will only act as a simple keyboard, the written payload will be typed once the USB has been plugged. Hence, if you don’t have into account delays like time between pressing Crtl + Alt
Becouse of the shell popping up or time required to download your backdoor from Internet, you could have problems because the rubber ducky will continue typing before an action has been completed.
Victim
Once you have performed you reckon, you will be likely to pick out a key target. It could be an old computer from the 60s, a current Mac, a Windows gaming PC or even a simple Linux system.
Research
With your victim in mind, research the operative system of the machines. If possible, obtain similar hardware or emulate the target in a virtual machine. Try to match the target as closely as possible with an actual PC or virtual machines. As I said before, take into account timings, they take an important role in these keystroke injection attacks.
Write
Begin writing your payload by first manually typing into the test machine, making notes about keystrokes needed and delays taken into account to accomplish your objective.
Finally, when you have successfully reproduce your desired outcome manually, you will be ready to move on to writing the corresponding USB Rubber Ducky payload to automate the task.
Encode
Using one of the many duck encoders, specify the ducky script as the input and the inject.bin as your output. Copy this inject.bin file to the root of the micro SD card.
Depending on your victim’s keyboard layout, you may need to specify a language file, due to different regions have different keymaps.
Test
To execute your first test, load the inject.bin in the SD card, then insert the SD card into the Rubber Ducky and finally, connect it to the target test machine.
Now it is time to take notes
- Did it fail?
- Did it succeed?
- Do I need to delay more each keystroke?
- Do I need increase the keystrokes per second?
- Does this command even exist on this environment?
This process could be repeated several times before getting the perfect performance.
Deploy
With the payload written, tested and optimized, you are finally ready to deploy it against the victim. Because the scenario always vary the attacker should develop strategies to obtain the victim’s pc unobserved and with physical access. It’s time to get creative!!!
Ducky Script Syntax
The Ducky Script was developed by Darren Kitchen, inspired by BASIC, the first programming language.
REM: Lines beginning with REM will not be processed, same as comment or remark.
DEFAULT_DELAY: It is used to define how many milliseconds to wait between each subsequent command (milliseconds * 10). For instance, DEFAULT_DELAY 11 = 110ms
DELAY: Creates a momentary pause in the ducky script. It is quite handy for creating a moment of pause between sequential commands that may take the victim’s computer some time to process.
STRING: It processes the following text, taking special care to autoshift. As an example, STRING Hello World!
WINDOWS or GUI: Emulates the Windows-Key. E.g. Gui r = Pressing Windows Key + r
MENU or APP: Emulates the App key, sometimes referred to as the menu key or context menu key. It will produce the menu like clicking a right-click.
SHIFT: Unlike CAPSLOCK (cruise control for cool) the SHIFT command can be used when navigating fields to select text or other things.
E.g. SHIFT | DELETE, HOME, INSERT, PAGEUP, PAGEDOWN, WINDOWS, GUI, UPARROW, DOWNARROW, LEFTARROW, RIGHTARROW, TAB
ALT
E.g. ALT | END, ESC, ESCAPE, F1X, Single Char, SPACE, TAB
CONTROL or CTRL
E.g. (CONTROL | CRTL) | BREAK, PAUSE, FX, ESCAPE, ESC, Single Char
ARROW KEYS
E.g. DOWNARROW | DOWN, LEFTARROW | LEFT, RIGHTARROW | RIGHT, UPARROW | UP
BREAK | PAUSE
CAPSLOCK
DELETE
END
ESC | ESCAPE
HOME
INSERT
NUMLOCK
PAGEUP
PAGEDOWN
PRINTSCREEN
SCROLLLOCK
SPACE
TAB
Let’s do it
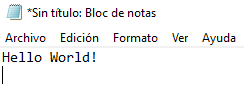
As the first script, like in every single programming guide, you should start writing something simple like "Hello World!". In this example, the hacker will write on the victim’s computer with notepad.exe the clause "Hello World!". Although, it can be seen like an easy task, without a mouse things get trickier. Finally, before getting any further this script will only works on Windows versions from Windows 95 to Windows 10.
Now, you have got your Rubber Ducky payload is time to process it, for that you will need an encoder. Feel free to use an online or offline in encoder:
In my case I’m going to use an online encoder, because I don’t want to install more programs on my computer.
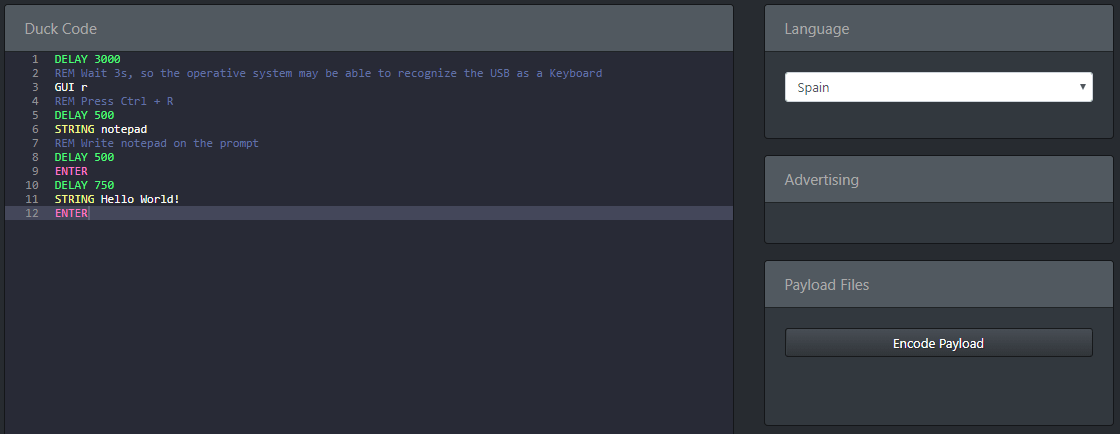
Before clicking on "Encode Payload" take into account, that you have to choose your victim’s keyboard language, so you won’t see weird things being typed on your victim’s computer.
Finally, download your inject.file into your SD card, put it on your Rubber Ducky and plug your USB into your victim’s computer.
Payloads
Payload Chrome Password Stealer (Windows 7): Steals Chrome passwords Google Chrome Version 36.0.1985.143 and below.
Payload Generator A payload generator which allows you to create a new payload as a combination of other payloads.
Official payload List: Official payload lust publicised by hak5.
Finally, if you don’t have enough money, I leave you a link to a Digispark Tutorial video, a 1$ version of the Rubber Ducky, in order to start perform some attacks and learning new scripts for this tiny Rubber Ducky.